Record An LP/Tape To Audio Files
Step 1: Hookup Your Record Or Cassette Player Yo Your Computer
Run the software and click "Hookup Wizard". It will guide you through a series of questions and show you photos and images to help you hook up your record or cassette player to your computer.

Step 2: Get A Good Recording Level
The first time you run the software, it will ask you if you want to run the "Recording Level Wizard". Click "Yes" or click "Level Wizard"

Once the wizard starts, click the "Start" button and follow the instructions. (It will have you play the loudest part of the record or tape.) If you see a level, but don't hear anything and are recording off of a USB device, click the "Monitor" checkbox.
Step 3: Click "Record"
If you are recording a tape, make sure to rewind it. Click "Record" and start playing your record or tape. Once it is done, flip over the record or tape and play side two. When it's finished, click "Next" or "Stop". (Type or Look Up Album Information During Recording)

Step 4: Preview And Edit Your Recording
The software automatically splits your recording up into tracks. If there were any erroneous tracks created or if there was extra silence, you can edit it by clicking "Split" and/or by dragging the track markers.
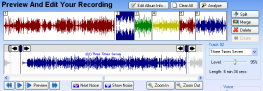
If the recording has lots of clicks and pops, select a built in cleaning preset. Once you are satisfied, click "Next"
Step 5: Tag / Name Your Recording
Enter in the artist, album, genre and track names. This will affect how the individual MP3s are named and tagged.
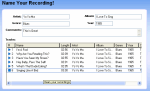
Click "Next" when you are done.
Step 6: Pick A Destination & Format.
If you want to put it on an MP3 player, make sure it's plugged in and then click "Choose" and select it from the list. Otherwise, choose a folder on your computer. You can also choose a format (MP3*, OGG, WAV or WMA) and click "Details" to change the bit rate and other advanced settings.
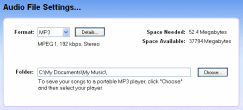
Click "Next" and it will create your audio files!
* Creating MP3s is not available in some bundled versions of Spin It Again.
Step 1: Hookup Your Record Or Cassette Player Yo Your Computer
Run the software and click "Hookup Wizard". It will guide you through a series of questions and show you photos and images to help you hook up your record or cassette player to your computer.
Step 2: Get A Good Recording Level
The first time you run the software, it will ask you if you want to run the "Recording Level Wizard". Click "Yes" or click "Level Wizard"
Once the wizard starts, click the "Start" button and follow the instructions. (It will have you play the loudest part of the record or tape.) If you see a level, but don't hear anything and are recording off of a USB device, click the "Monitor" checkbox.
Step 3: Click "Record"
If you are recording a tape, make sure to rewind it. Click "Record" and start playing your record or tape. Once it is done, flip over the record or tape and play side two. When it's finished, click "Next" or "Stop". (Type or Look Up Album Information During Recording)
Step 4: Preview And Edit Your Recording
The software automatically splits your recording up into tracks. If there were any erroneous tracks created or if there was extra silence, you can edit it by clicking "Split" and/or by dragging the track markers.
If the recording has lots of clicks and pops, select a built in cleaning preset. Once you are satisfied, click "Next"
Step 5: Tag / Name Your Recording
Enter in the artist, album, genre and track names. This will affect how the individual MP3s are named and tagged.
Click "Next" when you are done.
Step 6: Pick A Destination & Format.
If you want to put it on an MP3 player, make sure it's plugged in and then click "Choose" and select it from the list. Otherwise, choose a folder on your computer. You can also choose a format (MP3*, OGG, WAV or WMA) and click "Details" to change the bit rate and other advanced settings.
Click "Next" and it will create your audio files!
* Creating MP3s is not available in some bundled versions of Spin It Again.