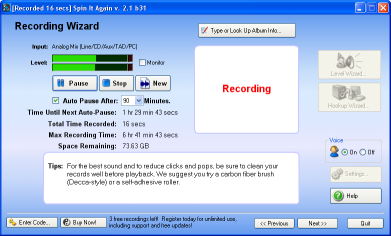
Recording Screen
Step 1: Make sure you are ready to record!
If you haven't hooked up your cassette or record player to your computer, run the "Hardware Hookup Wizard"
If you haven't adjusted your recording level, run the "Level Wizard"
Step 2: Adjust "Auto Pause" if necessary.
The software will automatically pause recording after a certain amount of time. If you are going to be gone for any amount of time, this allows you to set the maximum time it will record. Otherwise, it would fill up your hard drive with hours of silence.
Choose an auto pause time which is a little longer than the music you are going to record. For cassette tapes, make sure you rewind it first!
Step 3: Start recording
Click the "Record" button and then start playing the record or press play on the tape deck.
Step 4: Type or look up album information during recording
While the software is recording, click "Type or Look Up Album Info..." button and enter in the album and track information. On this pop up window, you can also click a button that lets you type in the album or artist name and automatically get the track and album information so you don't have to type it! (The track times and number of tracks can help in track detection, especially if the album has continuous audio such as a live or concert recording.)
Step 5: Record the other side of the tape or record
The software will automatically pause when it senses the end of the record. Flip the record or tape over and play side two.
If the software auto-paused, click "Record" before playing side two.
Step 6: Finished
Once the software senses the end of the side two or it auto-pauses, click "Next" to go to the "Preview And Edit" window.
Tutorial : Record A LP/Tape To CD
BUTTON REFERENCE
Record / Pause button
Press the Record button to start recording. As soon as you press Record, it turns into a Pause button. Clicking Pause will pause the recording so that you can take a break, flip over to another side, etc.
Stop button
The Stop button ends a recording. Once a recording is ended, you aren't able to append any more audio to it.
New button
This clears and deletes the current recording and lets you start over.
Monitor checkbox
If you have a USB sound device and you'd like to monitor or hear the recording in real time, click "Monitor" to turn it on.
Auto Pause After controls
If you are going to be gone or not actively monitoring the recording and you'd like to make sure that the software will not fill up your hard drive for hours and hours, make sure to check "Auto Pause After" and then select the maximum number of minutes that it will record for. (Spin It Again will stop recording if it thinks it has reached the end of an album, but if the record or tape player is noisey, it may not automatically turn off, which is why we created this fail safe for you.)
Voice On / Off
Turns the voice assistant on or off.
Level Wizard...
Runs the Recording Level Wizard
Hookup Wizard...
Runs the Hardware Hookup Wizard