Preview And Edit Screen
After you've finished recording, you have the chance of previewing and editing the recording so that you can remove extra silence, clean up the clicks, pops and remove unwanted tape hum. By default, the software will automatically split up the recording into multiple tracks based on a silence location algorithm and/or typed or looked up track times. (In some cases, it doesn't accurately split up the tracks and you'll need to edit the tracks manually. See track splitting troubleshooting.)
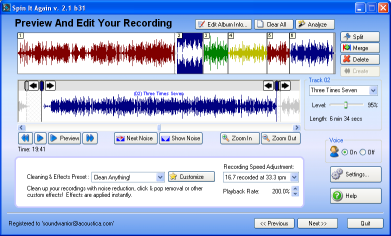
There are two views of the recording. The top view shows all the tracks, the track numbers and is a quick way of getting around the entire recording. The bottom view allows you to zoom in and out, and adjust the start and end of each track. (In the screen shot above, track three is shown in green.)
You can adjust a track's start and end by dragging it or clicking the track adjustment buttons.
The figure below shows some unwanted record noise highlighted by a red square.
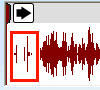
Adjust the start marker by dragging it to the right to get rid of the record noise.

Track one now starts at the beginning of the music.
You can also set the name and volume for each track as shown in the figure below.
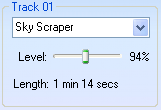
(If you have typed in or looked up album track names, they will appear in the drop down list.)
BUTTON REFERENCE
Edit Album Info... button
This pops up the Edit Track Information window that allows you to type in the track names, track lengths, album, genre, artist and year. In addition, you can click a button to look up the album information automatically online through the MusicBrainz.org lookup service!
Clear All button
Clears all track information and the recording becomes one large track.
Analyze button
Click this to reanalyze the recording for tracks. It will attempt to figure out where the tracks are and where the unwanted audio is. It won't always find all tracks. You can adjust three parameters: music threshold, minimum track length and minimum time between tracks. In addition, it will use any typed or looked up album track times to try and determine where the songs are. See track splitting troubleshooting for more help.)
Split button
This will split the currently selected track into two parts. This is useful if there are two tracks in a spot that the software auto determined to be one track.
Merge button
This will merge the currently selected track with either the next non-track space or track, which ever is first. This is useful if the software mistakenly made two tracks where there was really only one track.
Delete button
This will change a track into a non-track and the audio will be ignored for the mix down and burned CDs. If the software recorded a bunch of record needle noise at the end of the record or if there was a track that skipped for ever, use this to remove it.
Create button
This will restore an unwanted non-track space to become a track. Just select an unwanted non-track space and then click "Create" and it will turn into a track.
Rewind button
This selects the previous track. If it is currently playing, it plays the previous track.
Play / Stop button
This plays the recording. It will skip all non-track unwanted areas.
Fast Forward button
This selects the next track. If it is currently playing, it plays the next track.
Preview Play button
This will play a few seconds of the start and end of each track. If the voice assistant is on, she will say "Start Of Track " and "End Of Track" before each preview. (The default mode is to auto preview play when you first go to this screen.)
Zoom In button
This will zoom in to the recording for a closer and more detailed view.
Zoom Out button
This will zoom out of the recording for a larger view.
Next Noise button
If a noise print is set and the Acoustica Noise Reduction effect is loaded, this button will auto find the next best suited noise print. Troubleshooting noise reduction.
The noise print looks like this:
Show Noise button
If a noise print is set and the Acoustica Noise Reduction effect is loaded, this button will scroll to the current noise print. Note that you should stop play back before clicking this so that it doesn't auto scroll based on the current playback position. Troubleshooting noise reduction.
The noise print looks like this:
Cleaning & Effect Preset
This is a drop down control that lets you choose an effect preset, such as click and pop reduction, noise removal or other custom settings. Choose "<No Effect>" to turn off any processing. Choose "<Create New Effect>" to make your own meta preset.
More On Cleaning And Audio Effects
Built-in Effect Presets
Customize button
This lets you customize the currently loaded effect. Choose any effects in the list and adjust their settings. The software will handle third party DirectX and VST effects if installed.
More On Cleaning And Audio Effects
Recording Speed Adjustment
If you recorded a 78 at 45 rpm or a 16.7 @ 33 rpm, click the drop down and select the adjustment. This will set the appropriate playback rate to correct for the speed difference.
Playback Rate control
Adjust the play back rate to accommodate for record players that don't play back at the correct speed.
Voice On / Off
This turns the voice assistant on or off.
Settings Button
Launches the settings & preferences screen.
After you've finished recording, you have the chance of previewing and editing the recording so that you can remove extra silence, clean up the clicks, pops and remove unwanted tape hum. By default, the software will automatically split up the recording into multiple tracks based on a silence location algorithm and/or typed or looked up track times. (In some cases, it doesn't accurately split up the tracks and you'll need to edit the tracks manually. See track splitting troubleshooting.)
There are two views of the recording. The top view shows all the tracks, the track numbers and is a quick way of getting around the entire recording. The bottom view allows you to zoom in and out, and adjust the start and end of each track. (In the screen shot above, track three is shown in green.)
You can adjust a track's start and end by dragging it or clicking the track adjustment buttons.
The figure below shows some unwanted record noise highlighted by a red square.
Adjust the start marker by dragging it to the right to get rid of the record noise.
Track one now starts at the beginning of the music.
You can also set the name and volume for each track as shown in the figure below.
(If you have typed in or looked up album track names, they will appear in the drop down list.)
BUTTON REFERENCE
Edit Album Info... button
This pops up the Edit Track Information window that allows you to type in the track names, track lengths, album, genre, artist and year. In addition, you can click a button to look up the album information automatically online through the MusicBrainz.org lookup service!
Clear All button
Clears all track information and the recording becomes one large track.
Analyze button
Click this to reanalyze the recording for tracks. It will attempt to figure out where the tracks are and where the unwanted audio is. It won't always find all tracks. You can adjust three parameters: music threshold, minimum track length and minimum time between tracks. In addition, it will use any typed or looked up album track times to try and determine where the songs are. See track splitting troubleshooting for more help.)
Split button
This will split the currently selected track into two parts. This is useful if there are two tracks in a spot that the software auto determined to be one track.
Merge button
This will merge the currently selected track with either the next non-track space or track, which ever is first. This is useful if the software mistakenly made two tracks where there was really only one track.
Delete button
This will change a track into a non-track and the audio will be ignored for the mix down and burned CDs. If the software recorded a bunch of record needle noise at the end of the record or if there was a track that skipped for ever, use this to remove it.
Create button
This will restore an unwanted non-track space to become a track. Just select an unwanted non-track space and then click "Create" and it will turn into a track.
Rewind button
This selects the previous track. If it is currently playing, it plays the previous track.
Play / Stop button
This plays the recording. It will skip all non-track unwanted areas.
Fast Forward button
This selects the next track. If it is currently playing, it plays the next track.
Preview Play button
This will play a few seconds of the start and end of each track. If the voice assistant is on, she will say "Start Of Track " and "End Of Track" before each preview. (The default mode is to auto preview play when you first go to this screen.)
Zoom In button
This will zoom in to the recording for a closer and more detailed view.
Zoom Out button
This will zoom out of the recording for a larger view.
Next Noise button
If a noise print is set and the Acoustica Noise Reduction effect is loaded, this button will auto find the next best suited noise print. Troubleshooting noise reduction.
The noise print looks like this:
Show Noise button
If a noise print is set and the Acoustica Noise Reduction effect is loaded, this button will scroll to the current noise print. Note that you should stop play back before clicking this so that it doesn't auto scroll based on the current playback position. Troubleshooting noise reduction.
The noise print looks like this:
Cleaning & Effect Preset
This is a drop down control that lets you choose an effect preset, such as click and pop reduction, noise removal or other custom settings. Choose "<No Effect>" to turn off any processing. Choose "<Create New Effect>" to make your own meta preset.
More On Cleaning And Audio Effects
Built-in Effect Presets
Customize button
This lets you customize the currently loaded effect. Choose any effects in the list and adjust their settings. The software will handle third party DirectX and VST effects if installed.
More On Cleaning And Audio Effects
Recording Speed Adjustment
If you recorded a 78 at 45 rpm or a 16.7 @ 33 rpm, click the drop down and select the adjustment. This will set the appropriate playback rate to correct for the speed difference.
Playback Rate control
Adjust the play back rate to accommodate for record players that don't play back at the correct speed.
Voice On / Off
This turns the voice assistant on or off.
Settings Button
Launches the settings & preferences screen.