Reduce Tape Noise Hiss or Hum
Step 1: Load An Existing Recording or Record A Tape
Run the software and click "Load A Sound File" or go through the steps to record a tape
Step 2: Select A Noise Reduction Effect
On the bottom of the "Preview And Edit Your Recording" screen, you will be able to choose "Tape Noise BeGone" from the drop down box. ** Please note: When you select an effect preset, it will be instantaneously applied. Effect Presets Explained
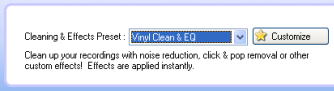
Click "Play" to listen to your recording without tape noise. The cleaning algorithms are applied in real time when you play the recording or burn a CD. (You do not need to listen to the whole recording to clean it as some users have tried to do.)
Step 3: Preview The Recording Without Noise
Click the "Play" button to listen to the recording without noise. If it sounds warbly or as if its under water, it means that it needs a better "noise print". The noise print is a part of the recording that is just noise and not music. The software subtracts the noise print out of the music to create noise-free music.
To automatically choose another noise print, click "Next Noise".

The noise print will look like this:
If it's still not sounding great, you can try right clicking on a noisy area and choose "Set As Noise Print". (Make sure to not choose an area with music.) Right click on the noise print and choose "Play Noise Print" to hear what it sounds like.
You can also drag and drop the noise print.
If it's sounding like it's under water or warbly, check out the noise reduction troubleshooting area.
Learn more about Cleaning And Audio Effects
Step 1: Load An Existing Recording or Record A Tape
Run the software and click "Load A Sound File" or go through the steps to record a tape
Step 2: Select A Noise Reduction Effect
On the bottom of the "Preview And Edit Your Recording" screen, you will be able to choose "Tape Noise BeGone" from the drop down box. ** Please note: When you select an effect preset, it will be instantaneously applied. Effect Presets Explained
Click "Play" to listen to your recording without tape noise. The cleaning algorithms are applied in real time when you play the recording or burn a CD. (You do not need to listen to the whole recording to clean it as some users have tried to do.)
Step 3: Preview The Recording Without Noise
Click the "Play" button to listen to the recording without noise. If it sounds warbly or as if its under water, it means that it needs a better "noise print". The noise print is a part of the recording that is just noise and not music. The software subtracts the noise print out of the music to create noise-free music.
To automatically choose another noise print, click "Next Noise".
The noise print will look like this:
If it's still not sounding great, you can try right clicking on a noisy area and choose "Set As Noise Print". (Make sure to not choose an area with music.) Right click on the noise print and choose "Play Noise Print" to hear what it sounds like.
You can also drag and drop the noise print.
If it's sounding like it's under water or warbly, check out the noise reduction troubleshooting area.
Learn more about Cleaning And Audio Effects